Screen sharing isn’t just about showing slides-it’s about keeping learners engaged
When you’re teaching online, your screen is your whiteboard, your textbook, and your stage. But too many instructors just click ‘Share Screen’ and then stand there like a statue while students stare at a frozen PowerPoint. That’s not teaching. That’s broadcasting. And it doesn’t work.
Real screen sharing in virtual classrooms means guiding attention, reducing confusion, and making every pixel count. It’s not about what you show-it’s about how you show it.
Start with a clean, clutter-free desktop
Before you hit share, take 30 seconds to clean up. Close every tab, app, and notification you don’t need. That Slack window blinking with messages? Hide it. Your desktop full of random PDFs and downloads? Move them to a folder. Even your wallpaper can distract if it’s busy or flashy.
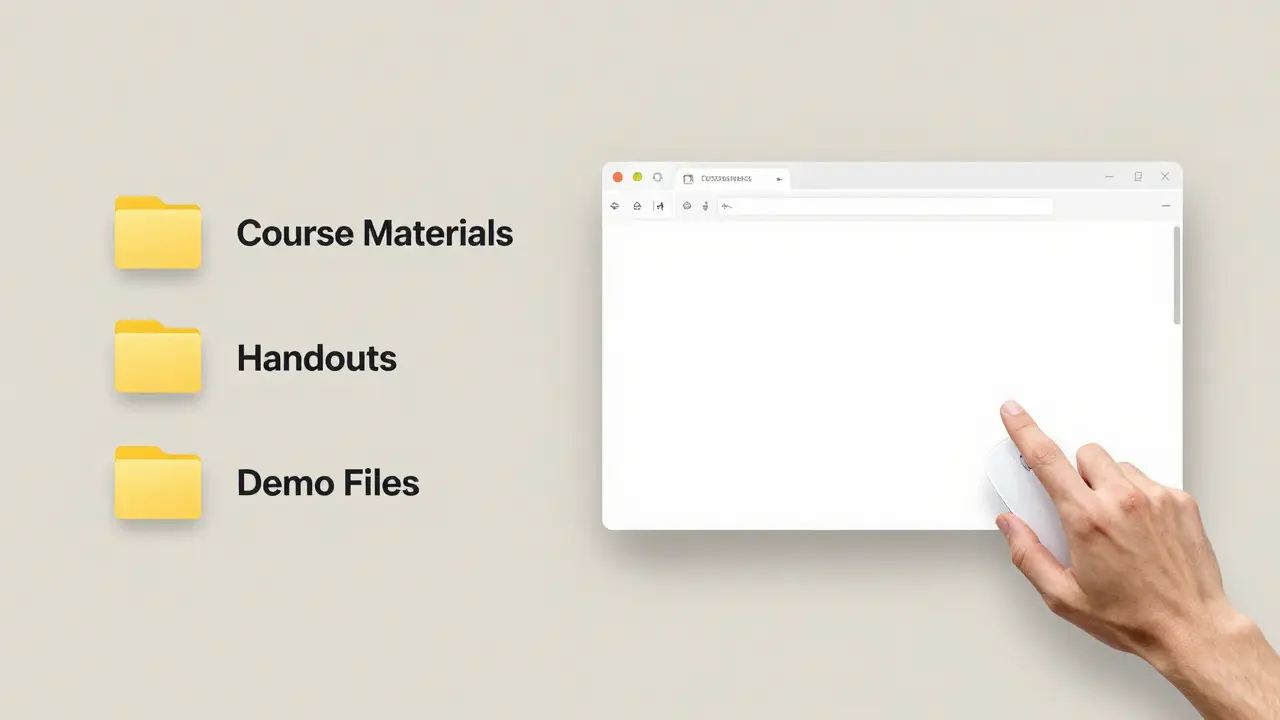
Students aren’t just looking at your content-they’re watching you. If they see your browser tabs labeled ‘Budget Spreadsheet (FINAL).xlsx’ or ‘Mom’s Birthday Party Pics’, it breaks their focus. Keep your screen professional and simple. Use a neutral desktop background. Organize your files into labeled folders like ‘Course Materials’, ‘Handouts’, and ‘Demo Files’.
Pro tip: Create a dedicated ‘Teaching Mode’ desktop profile on your computer. On Windows, use multiple desktops. On Mac, use Spaces. One for work, one for teaching. Flip between them with a keyboard shortcut. No more last-minute panic before class.
Share only what’s necessary-don’t overshare
Don’t share your entire screen unless you absolutely have to. Most platforms let you share a single window or application. Use that. Share your browser window when showing a website. Share your presentation app when going through slides. Share your code editor when walking through programming examples.
Why? Because when you share your whole screen, you risk exposing:
- Personal emails or calendar alerts
- Unsaved documents you forgot to close
- Background apps like Spotify or Zoom chat
- File names that reveal your internal naming system
One trainer I spoke to shared her whole screen during a marketing class-and accidentally revealed a draft email to her boss titled ‘Need to fire Sarah’. The class saw it. She never lived it down.
Always ask yourself: ‘Could this distract, confuse, or embarrass someone?’ If yes, don’t share it.
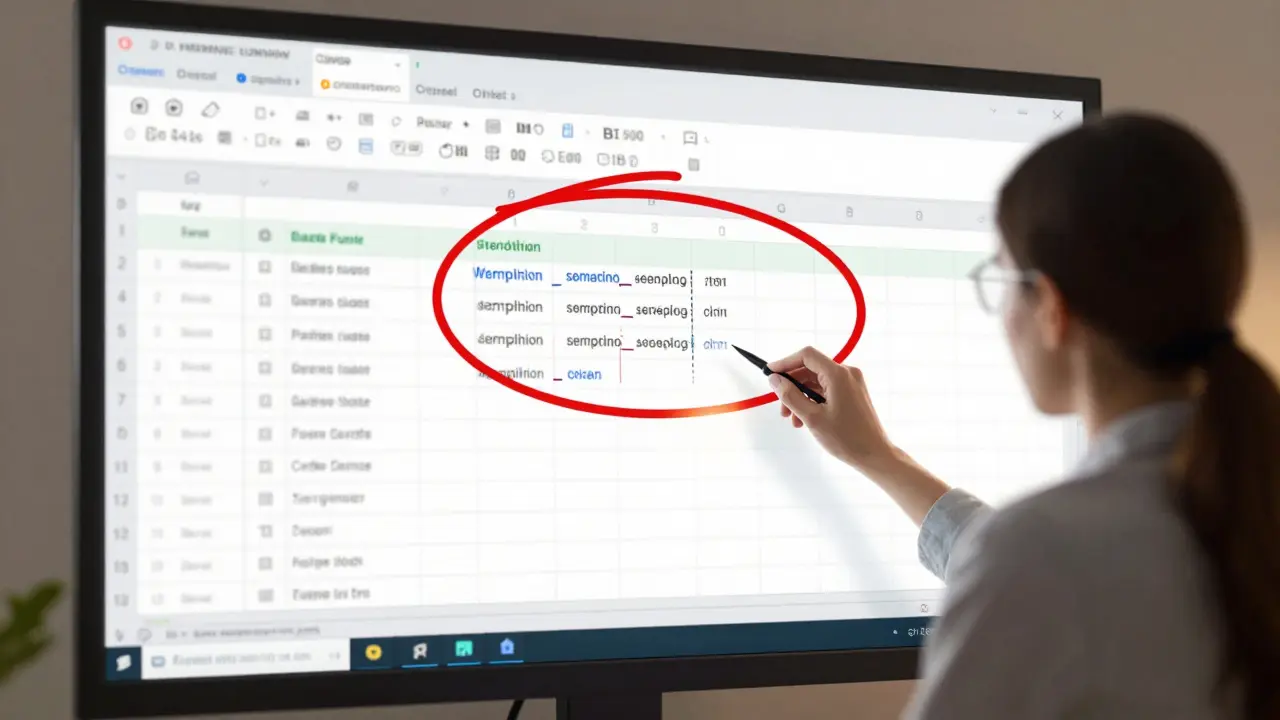
Use annotations and pointers to guide eyes
When you’re teaching online, you don’t have a laser pointer. You don’t have the ability to tap on a whiteboard. But you do have annotation tools-and they’re powerful.
Use them. Circle key terms. Highlight formulas. Draw arrows between concepts. Zoom in on small text. Most platforms (Zoom, Teams, Google Meet) have built-in annotation tools. Don’t ignore them.
Here’s how to use them effectively:
- Wait until you’re ready to explain something specific-don’t start drawing too early
- Use a contrasting color (red or yellow works best)
- Keep lines simple-no doodles, no cartoons
- Always explain what you’re marking: ‘See this part here? This is where the error happens’
One instructor teaching Excel to adult learners started using a red circle to highlight the ‘SUM’ function every time she used it. After three sessions, students began mimicking the gesture-literally circling cells on their own screens as they practiced. That’s retention.
Move your screen like a camera operator
Think of your screen like a film set. You’re the director. You control the framing.
Don’t just leave your presentation on screen and talk over it. Zoom in. Pan left. Reveal step-by-step. If you’re showing a website, don’t let students scroll themselves-do it for them. Click the next section. Scroll down slowly. Pause. Let them catch up.
When teaching coding, don’t just paste a block of code and say ‘Here’s the solution.’ Type it out live. One line at a time. Explain each part as you go. Even if you’re ahead of schedule, slow down. The students aren’t reading as fast as you are.
One software trainer I observed used a two-monitor setup. One monitor showed the full code. The other showed only the current line being explained. He shared the second screen. Students said it felt like he was sitting next to them, guiding their eyes.
Test your setup before every session
You wouldn’t walk into a physical classroom without checking the projector. Don’t walk into a virtual one without checking your screen share.
Do this before every class:
- Start a test meeting with a friend or colleague
- Share your screen and ask: ‘Can you read this?’
- Check font sizes-text under 14pt is hard to read on small screens
- Test color contrast-dark text on light background is best
- Try switching between windows to make sure it’s smooth
One instructor skipped this step and shared her screen during a live training. The font was too small. Students couldn’t read the code. Half the class asked her to send the slides afterward. She lost 20 minutes of teaching time fixing it.
Set up a quick checklist: Screen Share Test → Font Size → Color Contrast → Window Switching → Audio Sync. Do it in 5 minutes. Save yourself hours of frustration.
Give students control when it helps
There’s a myth that instructors must control everything. Not true.
Let students share their screens too. Especially during practice sessions. If you’re teaching graphic design, ask a student to share their screen and walk you through their process. If you’re teaching writing, have them share their draft and explain their structure.
This does three things:
- Builds confidence
- Reveals real misunderstandings
- Turns passive learners into active participants
Just set ground rules: ‘Only share what’s relevant. No personal files. No social media.’ Use the ‘Request to Share’ feature so you can approve each time. It keeps things safe and focused.
Use screen sharing to reinforce, not replace, your voice
The biggest mistake? Talking while the screen is static. You’re not a voiceover for a slideshow. You’re a guide.
When you’re sharing your screen, your voice should match what’s on it. Don’t say ‘So here’s the formula’ while you’re still scrolling to the next slide. Wait until it’s visible. Then say it.
Pause after you reveal something new. Let it sink in. Say: ‘Take 5 seconds to look at this. What do you notice?’
One biology instructor teaching cell structures paused for 8 seconds after showing a diagram of mitochondria. She didn’t say a word. Then she asked: ‘What’s the one thing you’d ask if you saw this in a lab?’ The discussion that followed was richer than any lecture she’d given before.
Record and review your sessions
After your first few sessions, watch the recording. Not to see how you looked. To see how your screen looked.
Ask yourself:
- Did I share too much? Too little?
- Was the text readable?
- Did I move the screen smoothly?
- Did I forget to annotate something important?
- Did students seem confused at any point?
One trainer noticed that every time she switched from her slides to her browser, students stopped asking questions. She realized she was switching too fast. She slowed down. Her engagement scores jumped 40% in two weeks.
Record every session. Review one every week. You’ll improve faster than you think.
Common mistakes to avoid
- Sharing your whole desktop - Too risky, too messy
- Not testing fonts - Text that looks fine on your 27-inch monitor is unreadable on a phone
- Using too many colors - Bright green, neon pink, flashing arrows = distraction
- Letting students control your screen - Unless you’re doing a collaborative exercise, keep control
- Ignoring audio sync - If your video lags behind your voice, students tune out
- Sharing copyrighted material without permission - Even if it’s for education, some content is protected
Final tip: Make screen sharing intentional
Every time you share your screen, ask: ‘What do I want them to see? What do I want them to do?’
If you can’t answer that, don’t share.
Screen sharing isn’t a feature. It’s a teaching tool. Use it like one.
What’s the best screen sharing tool for instructors?
There’s no single ‘best’ tool-it depends on your needs. Zoom is popular for its annotation tools and ease of use. Microsoft Teams integrates well with Office 365 and is great for schools using Microsoft products. Google Meet works smoothly with Google Classroom and is simple for beginners. For advanced users who need precise control, OBS Studio can be used to create custom screen layouts, though it requires setup. Choose based on your platform, student tech level, and whether you need recording, annotation, or breakout room support.
Should I share my screen or just my camera?
Use both. Your camera builds connection. Your screen delivers content. Don’t choose one over the other. Start with your camera to greet students, then switch to screen share when explaining material. Go back to camera for questions or feedback. The rhythm of switching between face and screen keeps students engaged and reminds them they’re learning from a person, not a video.
How do I prevent students from seeing my private files?
Never share your entire desktop. Always share a single window or application. Close all unnecessary tabs and apps before class. Use a separate user profile or desktop space for teaching. Check your file names-rename files like ‘Final_Grade_Report.xlsx’ to ‘Course_Grades_2026.pdf’. And always do a quick 30-second screen check before hitting ‘Share’.
Can I let students share their screens too?
Yes-and you should. It’s one of the most effective ways to assess understanding. Let students share their work during practice exercises. Ask them to explain their process. Use the ‘Request to Share’ feature so you can approve each time. This builds accountability and gives you real-time insight into where students struggle.
Why does my screen share look blurry?
Blurry screen sharing usually means low bandwidth or incorrect settings. First, check your internet speed-aim for at least 5 Mbps upload. In Zoom or Teams, go to Settings > Video > Screen Sharing and set it to ‘Optimize for Video Clip’ or ‘High Quality’. Avoid sharing 4K content unless you’re certain the network can handle it. Also, reduce the number of open applications-each one uses memory and slows performance.

Comments (9)
kelvin kind January 20 2026
Been using this for months. Just share the browser window. Done. No more accidental Slack pops or weird desktop pics. Easy.
Ian Cassidy January 20 2026
Pro tip: Use OBS for multi-source screen sharing. You can layer your slide deck, webcam feed, and annotation overlay in real-time. It’s not just screen sharing-it’s production-grade pedagogy. Buffering’s a bitch though, so keep your encoding at 1080p30 max unless you’ve got fiber.
Zach Beggs January 22 2026
This is spot on. I started doing the two-monitor thing last semester-one for full view, one for live demo. Students said it felt like I was right there with them. No more ‘wait, which line are we on?’ chaos. Also, the 30-second desktop clean-up? Game changer. I even made a checklist on my fridge.
Kenny Stockman January 22 2026
Love the part about letting students share their screens. I do this during coding labs and it’s wild how much more they learn when they’re explaining instead of just watching. Also, the pause after showing something new? Genius. I used to rush. Now I just say ‘take a sec’ and let silence do the work. Magic.
Antonio Hunter January 23 2026
There’s an unspoken psychological layer here that’s rarely addressed: screen sharing isn’t just a technical act-it’s a relational one. When you share your entire desktop, you’re inviting students into your personal digital space. Even if they don’t consciously notice the ‘Mom’s Birthday Party Pics’ folder, it subconsciously erodes the professional boundary. Conversely, when you curate your screen like a gallery-clean, intentional, focused-you signal respect for their cognitive load. This isn’t about tech. It’s about pedagogical empathy. And the annotation technique? That’s scaffolding in action. You’re not just showing content-you’re modeling how to attend, how to focus, how to parse complexity. That’s the real curriculum.
Ananya Sharma January 25 2026
Wow, another ‘screen sharing gospel’ post. Let me guess-you also tell people to drink 8 glasses of water and meditate before class? Newsflash: not everyone has a 27-inch monitor or a dedicated teaching desktop. I teach from a 13-inch MacBook Air in a shared apartment with three roommates and a screaming toddler. I don’t have ‘Spaces’ or ‘multiple desktops.’ I have one window open and pray. Your advice is for privileged educators with home offices. Most of us are just trying not to accidentally share our ex’s text messages while teaching Excel. Maybe instead of preaching perfection, suggest a ‘minimum viable screen share’-close the browser, mute Slack, and don’t be a creep. That’s enough.
Paritosh Bhagat January 26 2026
Also, I noticed you didn’t mention the fact that Zoom’s annotation tools are a nightmare on Linux. And what about students with color blindness? Red and yellow? Are you kidding me? That’s accessibility malpractice. Also, ‘neutral wallpaper’? That’s just white privilege. Some of us have cultural patterns on our desktops, and that’s part of our identity. You’re policing aesthetics like a corporate HR drone. And don’t even get me started on the ‘record and review’ advice-what if I’m an introvert who hates watching myself? You’re turning teaching into a performance art contest. Stop gaslighting people who don’t have your resources or personality type.
Ben De Keersmaecker January 27 2026
Minor grammatical nitpick: you write ‘Don’t share your entire screen unless you absolutely have to.’ Technically, it should be ‘unless you absolutely must,’ since ‘have to’ is informal and ‘must’ is the modal verb that correctly follows ‘absolutely’ in formal constructions. That said-brilliant post. The two-monitor setup insight alone is worth a master’s thesis. Also, the ‘pause after revealing’ technique? That’s cognitive load theory in practice. You’re giving students time for encoding, not just perception. And the part about renaming files? So simple, so overlooked. ‘Final_Grade_Report.xlsx’ → ‘Course_Grades_2026.pdf’? That’s not just privacy, that’s professional branding.
Aaron Elliott January 27 2026
While your recommendations are superficially pragmatic, they lack a foundational epistemological grounding. Screen sharing, as a mediated act of pedagogical transmission, cannot be reduced to ergonomic optimization or interface hygiene. One must interrogate the ontological implications of the digital gaze: when the instructor’s screen becomes the sole locus of epistemic authority, it reinforces a Cartesian dichotomy between the knowing subject and the passive object of knowledge. To ‘guide attention’ is to perpetuate a hegemonic model of instruction. True emancipatory pedagogy demands the deconstruction of the screen as a singular medium-preferably through distributed, blockchain-anchored, peer-to-peer knowledge networks where learners co-create the visual field. Until then, your suggestions remain technocratic band-aids on a systemic wound.